GDL2 Editor Primer
Install and run the GDL2 Editor
Install and run the GDL2 Editor
Before getting started, the GDL2 Editor (GE) needs to be installed. GE is a java-based, multi platform application used to create, edit, and run GDL files. GDL files (guides or guidelines) contain the clinical knowledge and application logic required for computerized clinical decision support. The GDL2 Editor is natural language- and reference terminology agnostic and has integral support for data models from two popular open health care data specifications – openEHR and HL7 FHIR. It leverages on the Reference Model and Archetype Model of openEHR as well as the Reference Information Model and Structure Definition of HL7 FHIR. The GDL2 Editor is used to define sets of rules as well as trigger events based on statements obtained from a reference clinical guideline. In addition to defining guideline rules and triggers, the GE also generates data entry forms based on the underlying archetypes or profiles which allow the user to input data that triggers the rules. When integrated with an EHR system, input data can be automatically acquired from the patient records triggering the decision support logic resulting in the relevant guideline-based recommendation.
Run the GE in the following way:
Run using Docker
- Download docker:
Windows: https://store.docker.com/editions/community/docker-ce-desktop-windows
Mac: https://store.docker.com/editions/community/docker-ce-desktop-mac - Restart the computer when prompted
- Run “docker run -p 8089:8080 cdsplatform/gdl2-editor:3.0.1” from any command prompt
Run using Java (works only on Windows machines)
Install the GE by downloading the gdl2-editor-v3.0.3.zip file. Unpack the zipped folder and double-click on gdl2-editor.exe. The command prompt shall appear with a message saying that the application has started. Keep the command prompt open for as long as you want to use the GE.
Please note that this alternative only works with Windows machines. Please try the installation with Docker if you are using another operating system.
Launch the GDL2 Editor
To launch the GE, open browser to “localhost:8080/gdl2-editor”
Creating the Guideline
After installing and running the GDL2 Editor, the following start-up screen will be displayed upon launching the program. The archetypes and profiles that will be used will first need to be imported to the GE. To do this, click on File in the menu bar, select Load Guidelines, Archetype, FHIR resources, click on Select file(s) and then choose the file that will be used. Multiple files can be compressed and be uploaded as a single zip file.
The GDL editor contains thirteen tabs.
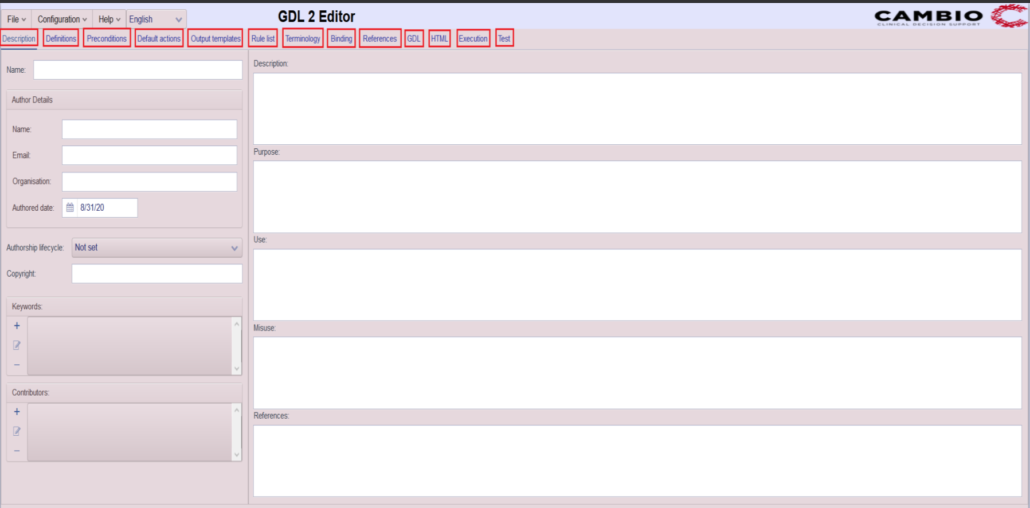
- Description: basic information about the guideline.
- Definitions: references to the archetypes used in the rules and preconditions.
- Preconditions: a list of required conditions for the execution of a guideline.
- Default actions: allows for building rules that ensure the model runs smoothly by setting up baseline values.
- Output templates: enables the authoring and management of FHIR-based as well as generic (nonstandard) output data templates.
- Rule list: a list of rules each containing rule conditions and rule actions.
- Terminology: a list of local terms and their associated term ids.
- Binding: mapping of the local codes used in the guideline to external terminologies.
- References: supports the indexing and mapping of reference articles that are the source of information displayed in CDS Hooks-based cards.
- GDL: the output of the editor in GDL format.
- HTML: the output of the editor in HTML format.
- Execution: allows for executing the guideline with specified input and displays the results. Also generates guideline test fixtures used for semi-automated guideline testing.
- Test: allows for saving, loading, and executing single or multiple semi-automated guideline tests using fixtures generated externally or in the Execution tab.
Metadata
Under the Description tab, the metadata should be filled in. The available sections are shown in the image below.
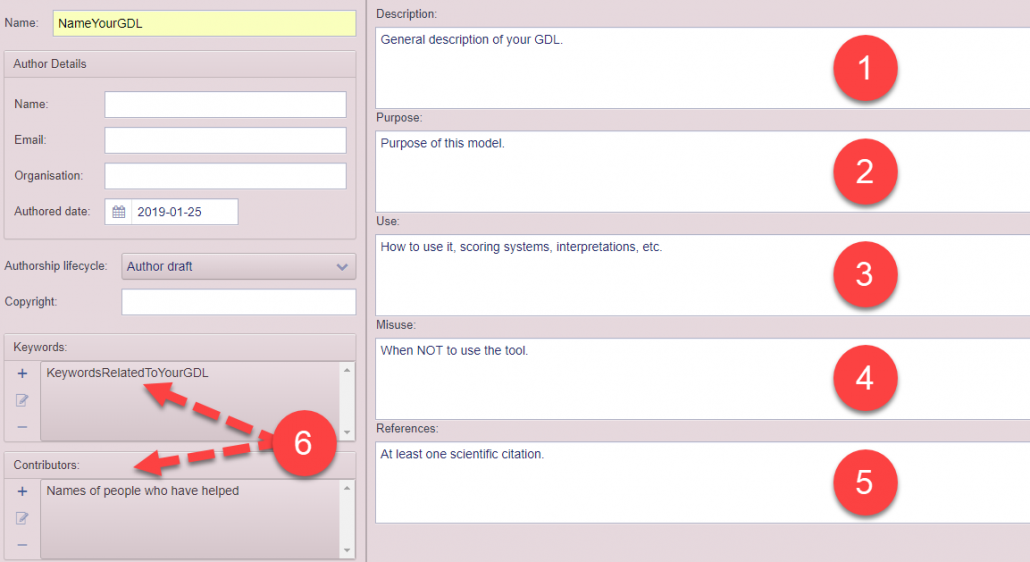
In the Description tab, one is able to insert the name of the guide, author details, copyright, keywords, and contributors, as shown on the left side of the image above. The text fields on the right side numbered 1-5 above, can be filled in directly. Keywords and contributors can be added by using the plus sign (6). The pencil on the paper icon can then be used to edit the entered text.
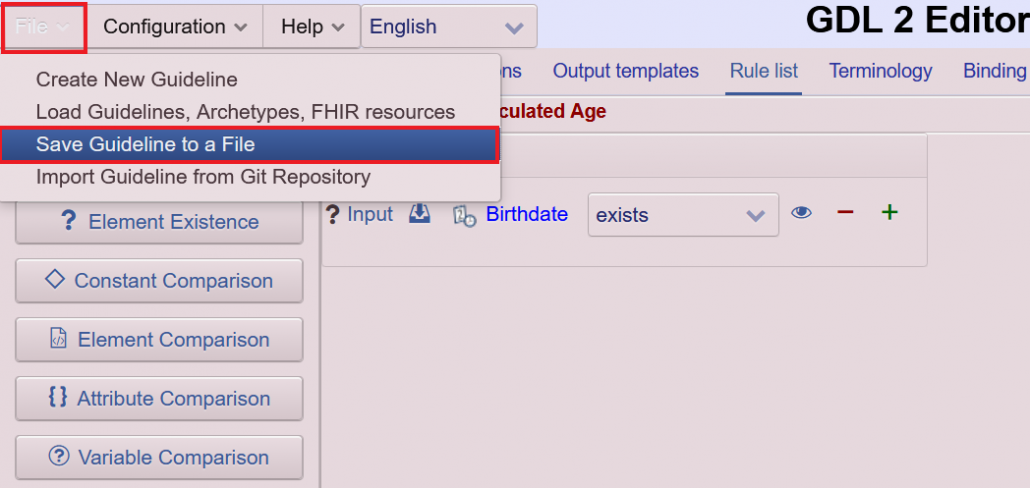
Once all the metadata is filled in, ensure the model is saved by clicking Guideline in the menu bar, selecting Save Guideline to a File, enter the file name, and clicking the checkmark.
Definitions Tab
When the Definitions tab is clicked, the following view will be displayed. The left side contains the selection of definitions that can be used in this screen of the editor.
The most commonly used in basic models are:
- Archetype instantiation, which is the first item to create as this allows for the GE to assign an already existing archetype or profile required to build the model.
- Element instantiation, which is a part of the instantiated archetype allowing specific elements to be assigned from the selected archetype.
- Function Predicate, which is used, for example, to create an event time element that can be used to ensure the values used in the tool are always the most recent.
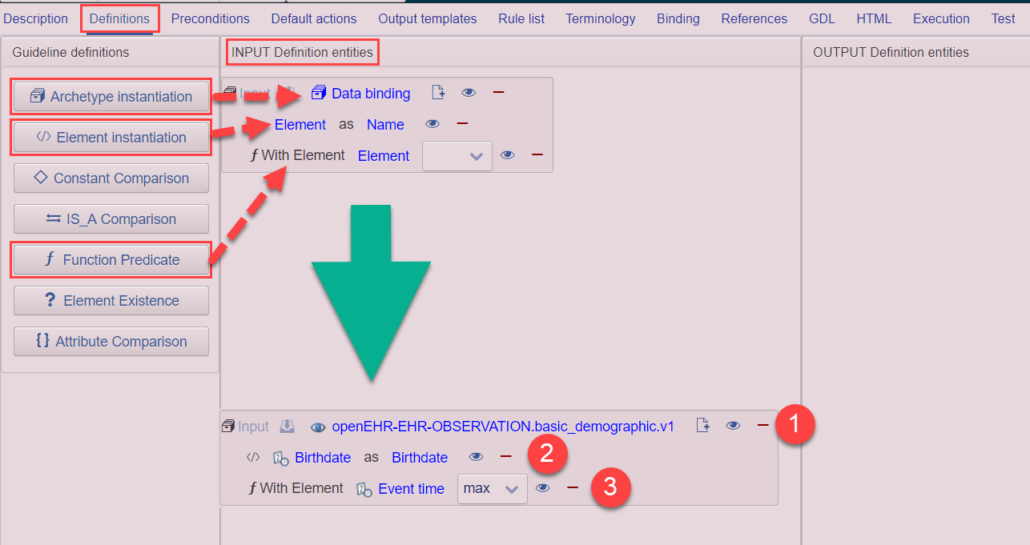
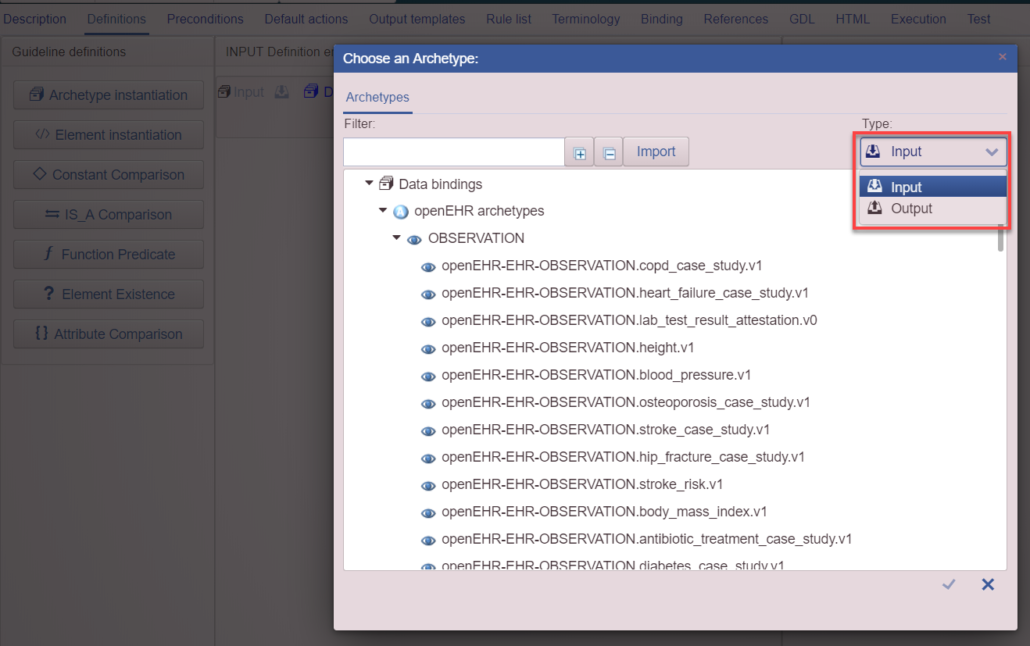
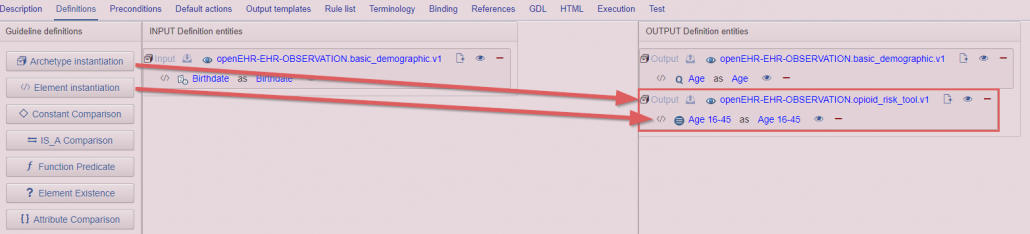
- Archetype instantiation is dragged and dropped into the main modeling area. Upon clicking on Data binding, a window revealing the list of archetypes and profiles imported to the GE is opened. Here the “Basic Demographic” archetype, which provides data for age and sex etc., has been selected.
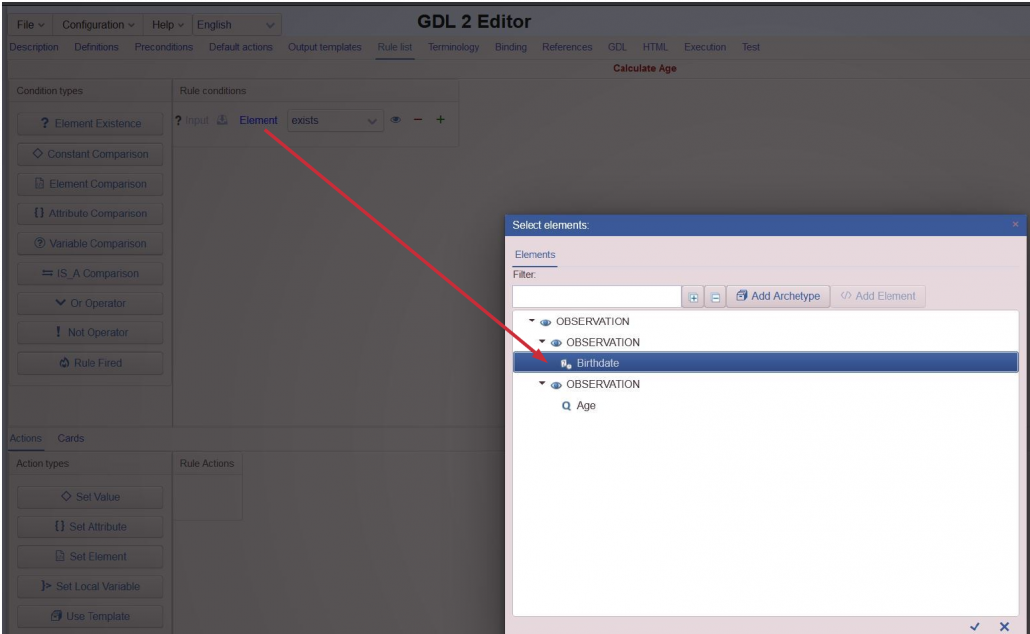
- Element instantiation is dragged and dropped on top of the already instantiated archetype/profile. When the Element field is clicked, a window opens that allows one to choose the specific element of interest; here “Birthdate” has been selected.
- Function Predicate is dragged and dropped on top of the instantiated archetype/profile. When the Element field is clicked, a window opens up that allows one to choose the specific element of interest; here, “Event time” is selected. From the drop-down menu max has then been selected; this function will ensure that the most recent data from the linked EHR is used.
Multiple archetypes may be instantiated depending on the model being built. In addition, the same archetype can be instantiated in different formats: INPUT and OUTPUT. The type is selected in the window opening upon clicking on Data binding.

In this image, both an INPUT and an OUTPUT type of the “Basic Demographic” archetype has been instantiated. The INPUT contains the birthdate element, allowing users to enter it using the date data type in the GE. This instantiation will contain user input.
The second instantiated archetype is of the OUTPUT type, containing the age element is displayed. This element is a quantity data type that will allow the model to store the actual age value. The birthdate input along with the current date entry will allow the age value to be calculated using a simple rule.
Rule List
Once all the archetypes/profiles have been instantiated, rules can be constructed by heading to the Rule list tab. In order to demonstrate this in a simple way, the two basic demographic archetypes that were instantiated can be used to model a basic rule.
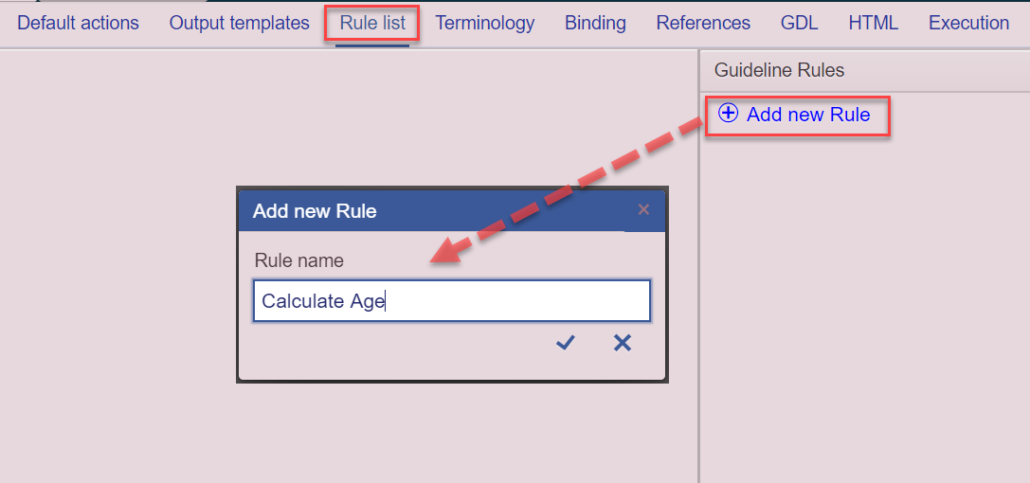
When one clicks on the Rule list tab, an empty rule area is shown. Upon clicking the Add new Rule button, the Add new Rule box opens into which the rule name can be entered.
Once the rule has been named, the editor displays the following editing screen:
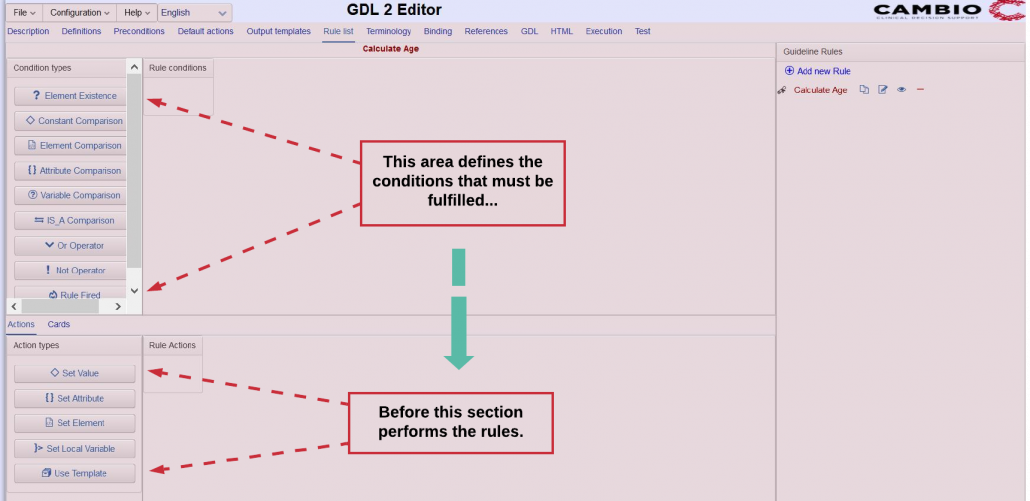
The empty modeling area related to the rule can be filled with the conditions listed on the left side of the screen.
In the example above, the rule has been named: “Calculate Age”. The purpose of this rule is to calculate the age of the patient by subtracting the patient’s birthdate from the current date.
There are five comparison conditions:
- Constant Comparison, which allows one to use comparators such as
- = (equal to),
- != (not equal to),
- > (greater than), etc. to compare elements to a variety of other items.
- Element Comparison, which allows one to compare an element with another element.
- Attribute Comparison, which allows one to compare an element using its attributes.
- Variable Comparison, which allows one to compare a variable to any value, set using the expression editor.
- IS_A Comparison, which is used to evaluate for, and identify a specific concept (sub-type) based on its logical relationship to a broader concept (super-type). E.g. Diabetes IS_A Condition. In GDL formalism, the IS_A comparison is represented using a reverse formalism.
There is also an “Element exists” condition, as well as an “Or operator” and a “Not operator”. In addition, there is a “Rule (Fired)” condition that checks whether a particular rule was fired or not as a condition for further triggering.
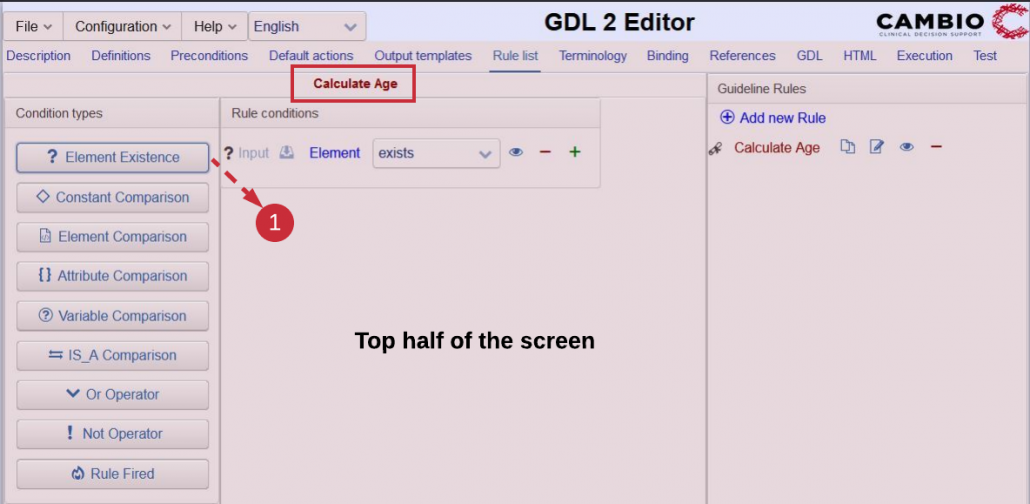
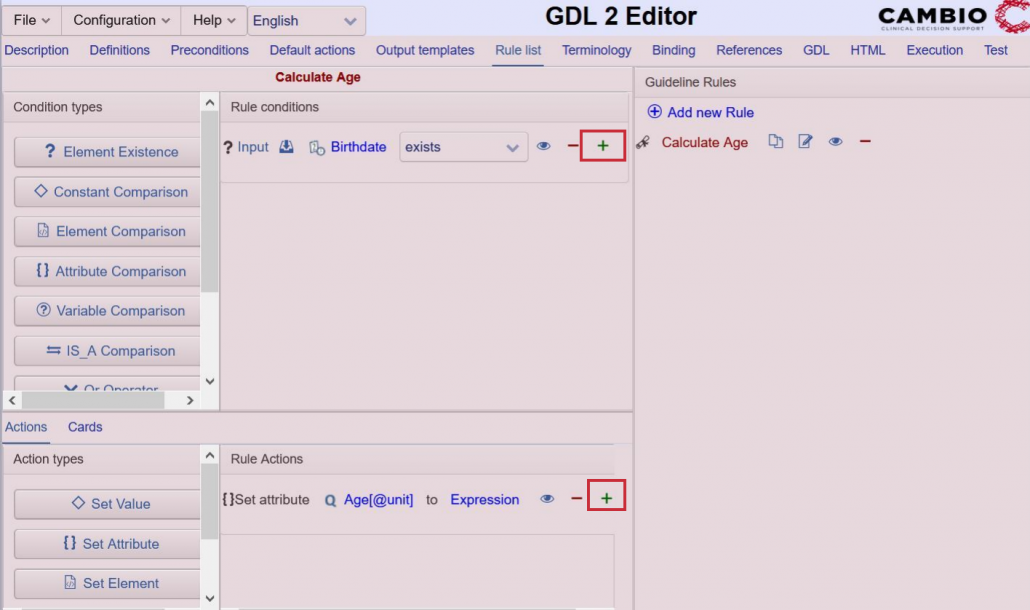
In order to calculate the age, one condition is required: the Element Existence.
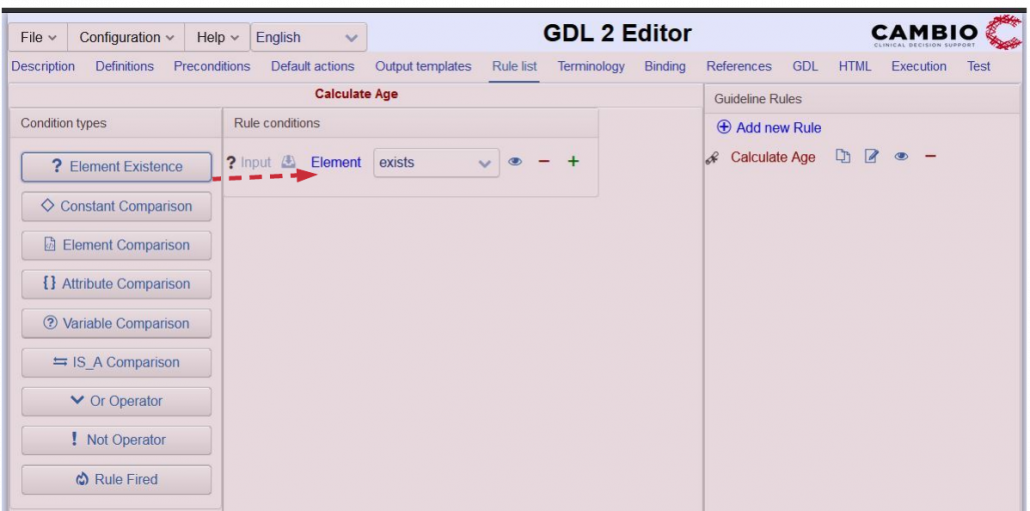
Drag and drop the Element Existence condition from the Condition types box on the left side into the Rule conditions area. Then click on the Element field to choose the element Birthdate:
Next, select exists from the drop-down menu (default in this case).
The condition: “Birthdate exists” ensures that there is a birthdate input from the EHR or user input before the rule is fulfilled – which is set in the bottom half of the screen.
There are five actions in the bottom half:
- Set Value: set element to a data value.
- Set Attribute: set element attribute to an attribute value.
- Set Element: set element to another element.
- Set Local Variable: to define, and set the value of, a variable that will only be used for intermediary operations within the index guideline. Local variables cannot be used to define input from or output to an EHR or other system outside the index guideline.
- Use Template: allows for setting any generic (nonstandard) template that should be instantiated as a result of rule execution.
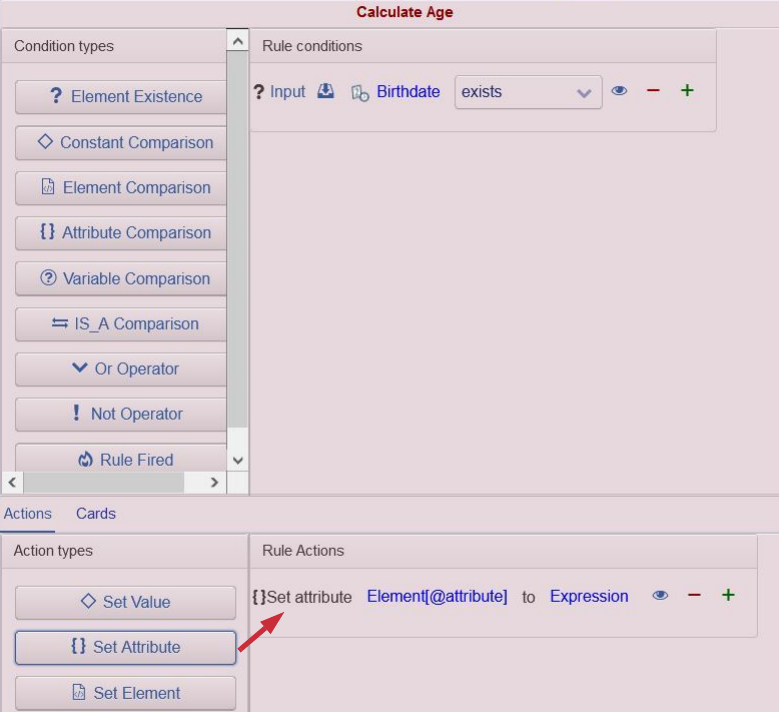
From the actions panel, the Set Attribute is dragged and dropped to prepare the actions that will be fired once the condition is fulfilled.
These actions are to set up the age on two attributes that are placed into two instantiated Set Attribute entries.
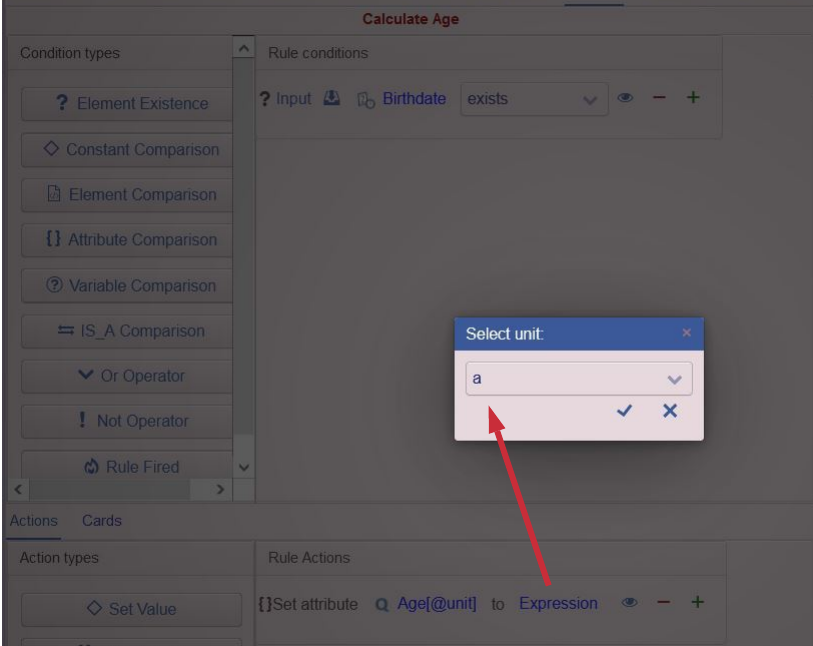
The first attribute will be assigned the Age units as “a” (Latin abbreviation for anno – year):
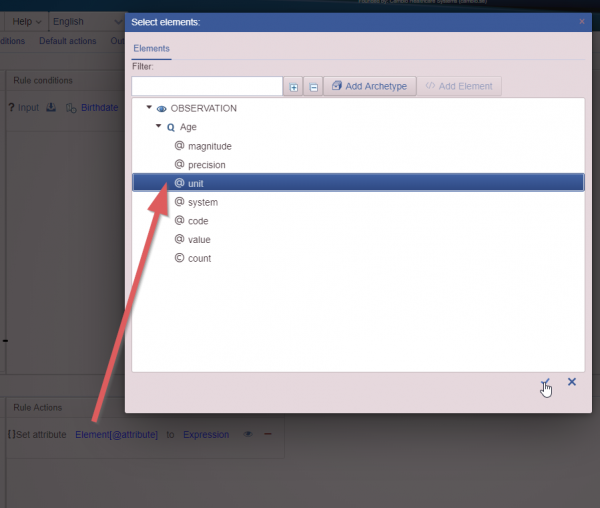
The Age magnitude attribute, which is calculated from the current date minus the birthdate, is instantiated next. To add the next action type (or Condition type), for instance, Age magnitude attribute, in this case, click on the ‘+’ sign.
This opens up a small window with a list of Action types and from this, the Set attribute is selected.
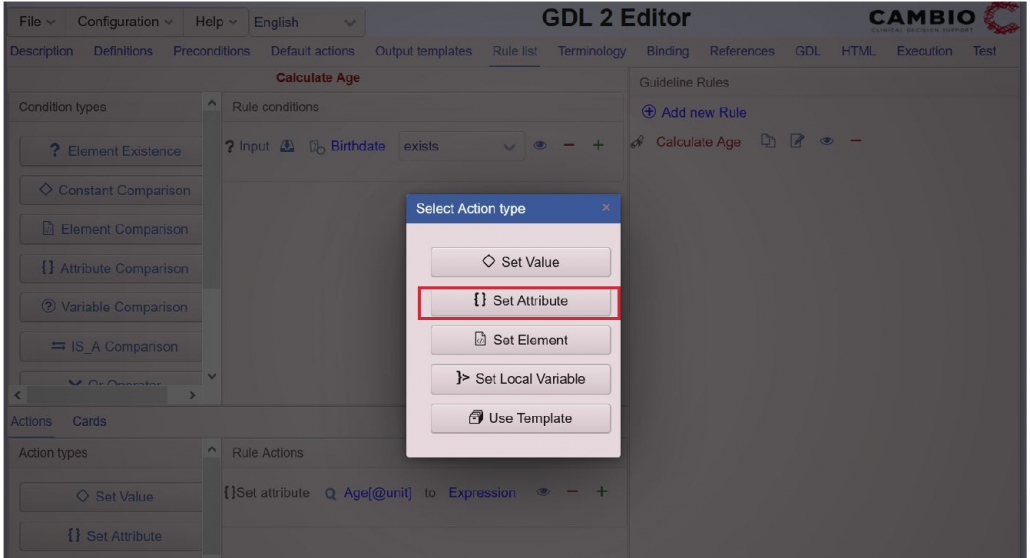
Then, the attribute, Age magnitude is added.
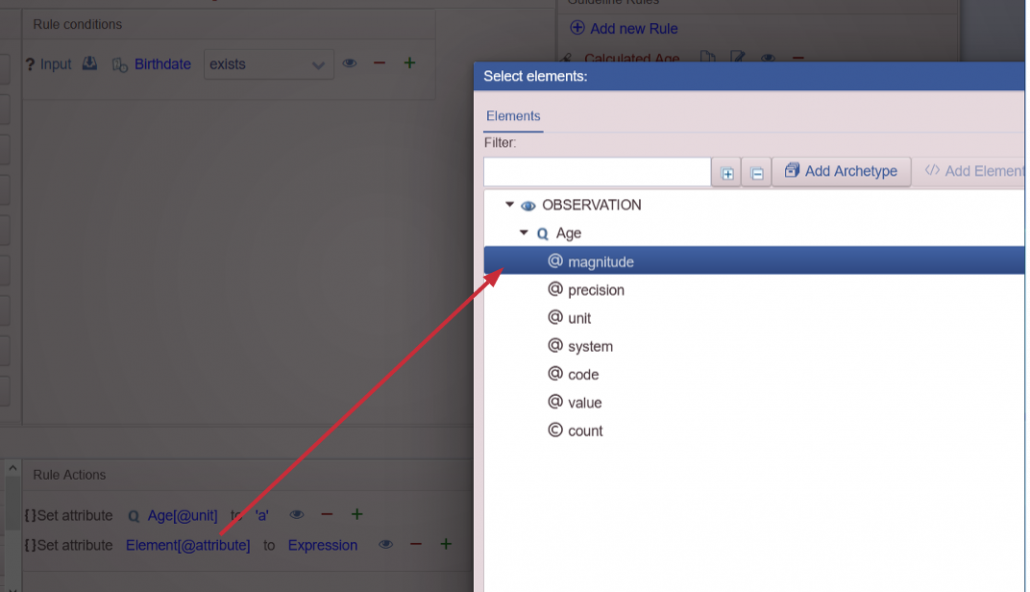
The calculation is inserted in the following images.
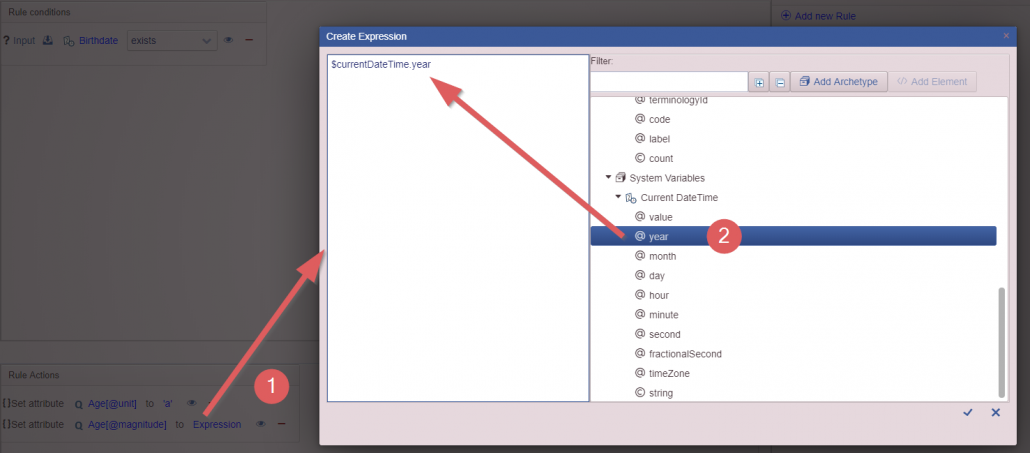
The calculation is added to the Create Expression editor as shown above.
-
- Clicking on Expression will open the Create Expression editor window.
- From the element list, scroll to the Current Date Time element and double-click the year This fills the “CurrentDate/Time/year” in the editor.
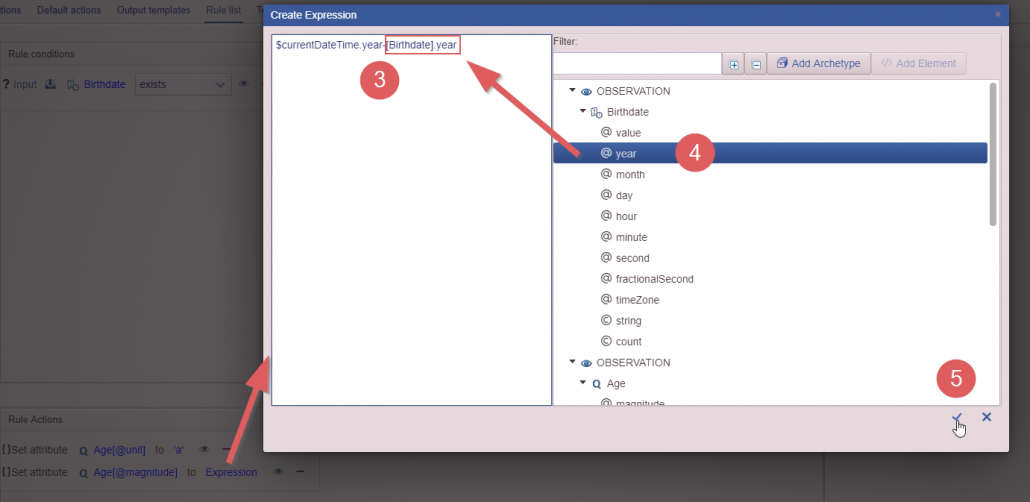
- Add a minus sign after the CurrentDate expression.
- Scroll to the Birthdate element from the list on the right and double-click year to insert it into the expression editor.
- Once the full expression has been entered, click the checkmark.

The full Calculate Age rule with its conditions and actions is shown above, and reads:
“If Birthdate exists, set Age to Current date minus Birthdate in years”
Once the rule has been completed, ensure the model is saved.
Executing the Rules

The created rule appears in the section Guideline Rules as shown above. We can now test that the rule works using the Execution tab.
Go to the Execution tab and click on the Refresh button to generate the execution input fields.

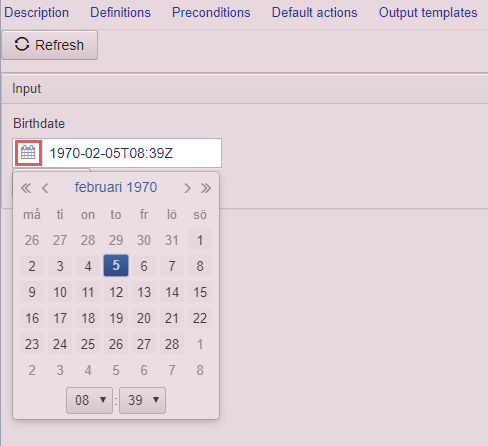
Fill in the birthdate by clicking on the calendar icon and select the date of birth in the calendar.
Click on Execute.
The result is shown below – Age 50 years:
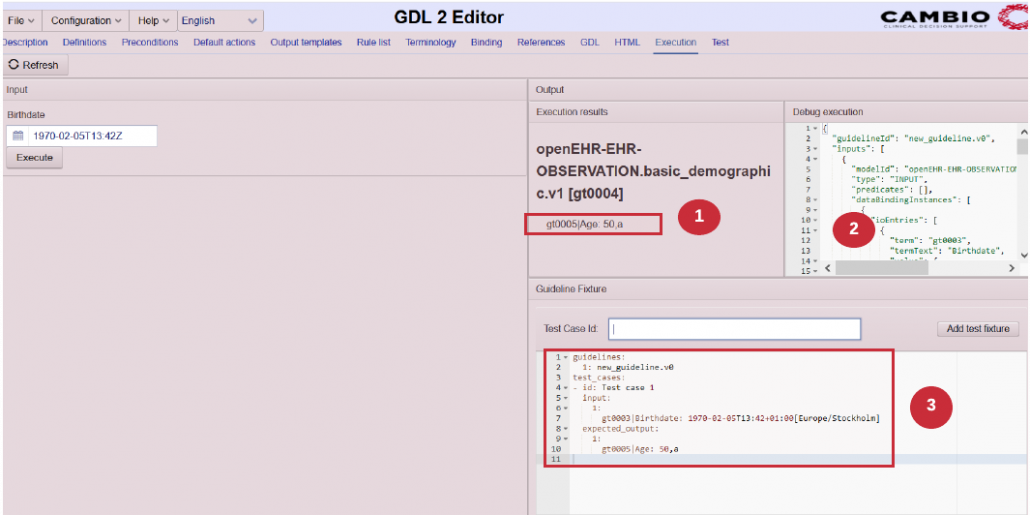
The right part of the Execution tab shows three output elements:
- The Execution results of the fired rules.
- The Debug execution providing info about the execution of the guideline with inputs, outputs, and order of rule execution.
- A Guideline fixture providing a test case for the guideline based on the current input.
Examples of other conditions and actions are shown in the next images.
Rules that describe a range condition:
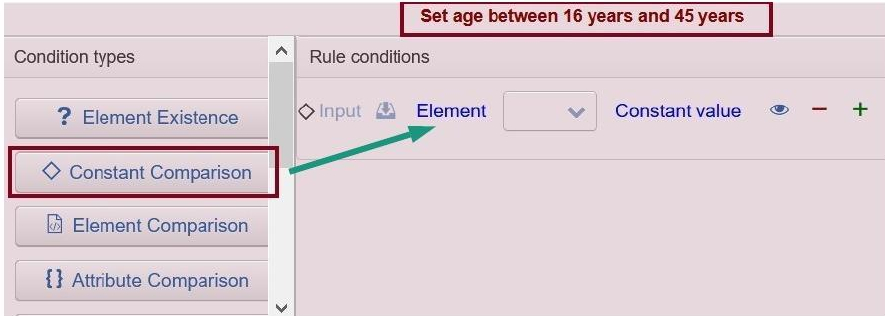
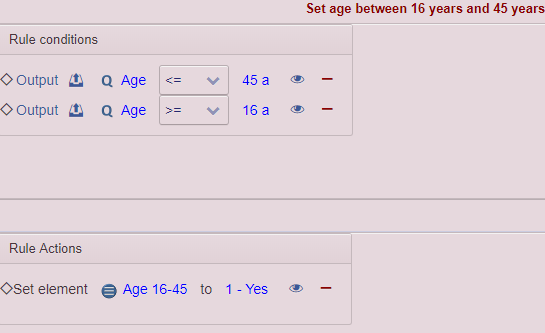
In the image above, a Constant Comparison condition element is dragged and dropped into the top half of the modelling area for a rule named: “Set age between 16 years and 45 years”.
The Age element of the Basic demographic archetype in the OUTPUT format (as it has been calculated from the birthdate as shown in the earlier part of this guide) is selected for the element type and the age 45 years is inserted. As the condition is an age range, greater than and less than operators are used as shown in the series of images below:
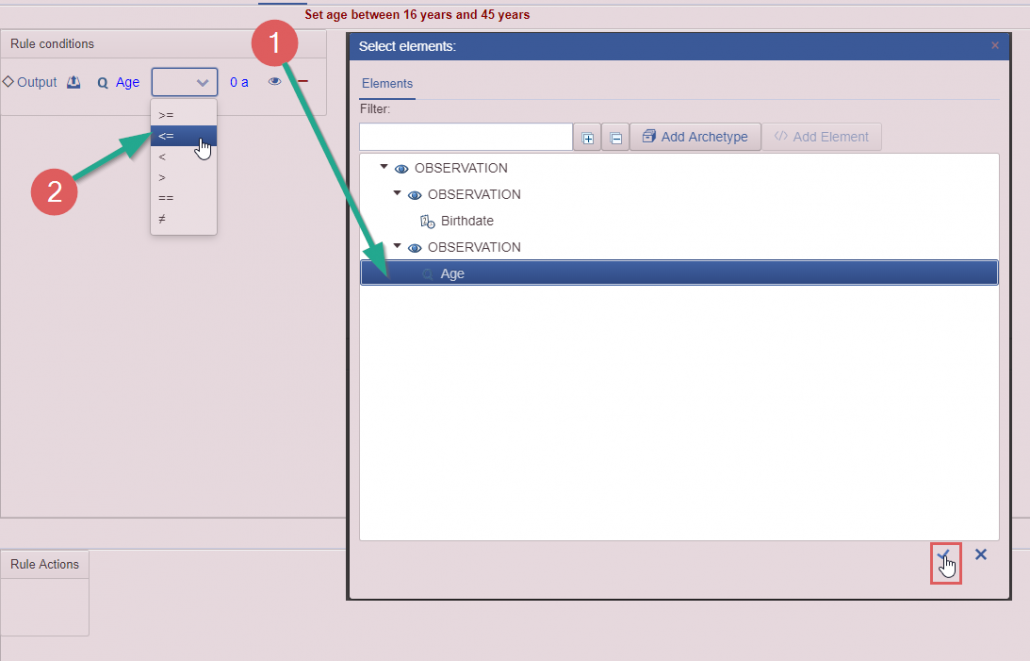
- Choose the Age attribute in the first slot on the element.
- Select the <= symbol in the drop-down menu.
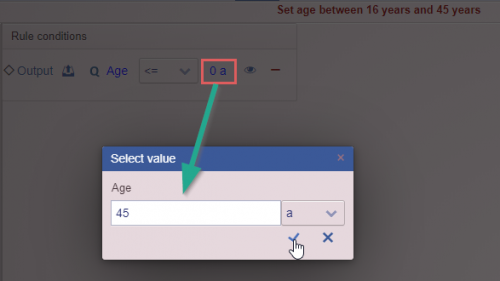
The first condition is Age <= 45 years as filled in on the image; “a” is “anno” which is Latin for year. The second condition, Age >= 16 years, is added in the same way and both are shown in the image below:
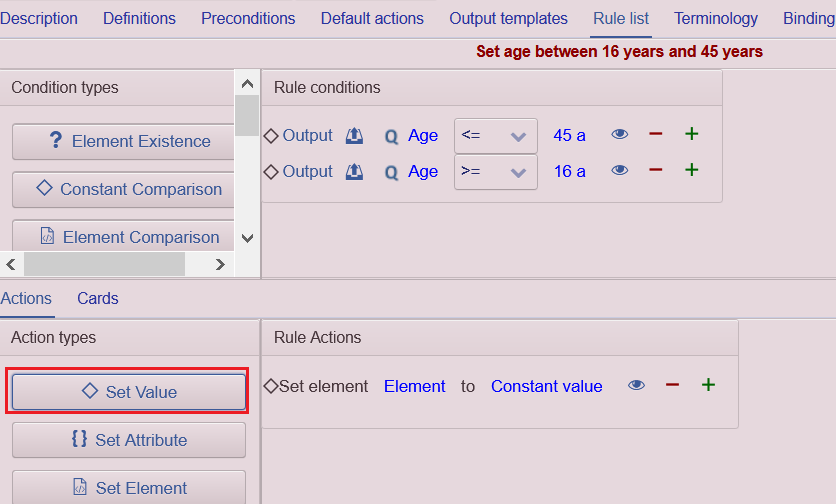
In order to enable a rule, we need to drag and drop action from the left as shown. However, our model is lacking an archetype that can hold the results of the condition we set in the top half of the screen, namely what to do with a value that is in the range as indicated. Thus, to do this, we would need to create/instantiate a slot of an archetype that would be able to hold this result. If we go back to the Definitions screen of the GE, we can add an archetype (here we added the “Opioid Risk Tool” archetype) which requires an ordinal slot that handles age ranges. This is shown below:
Thus, we are now able to allocate the result in the Action (bottom) part of the rule list:
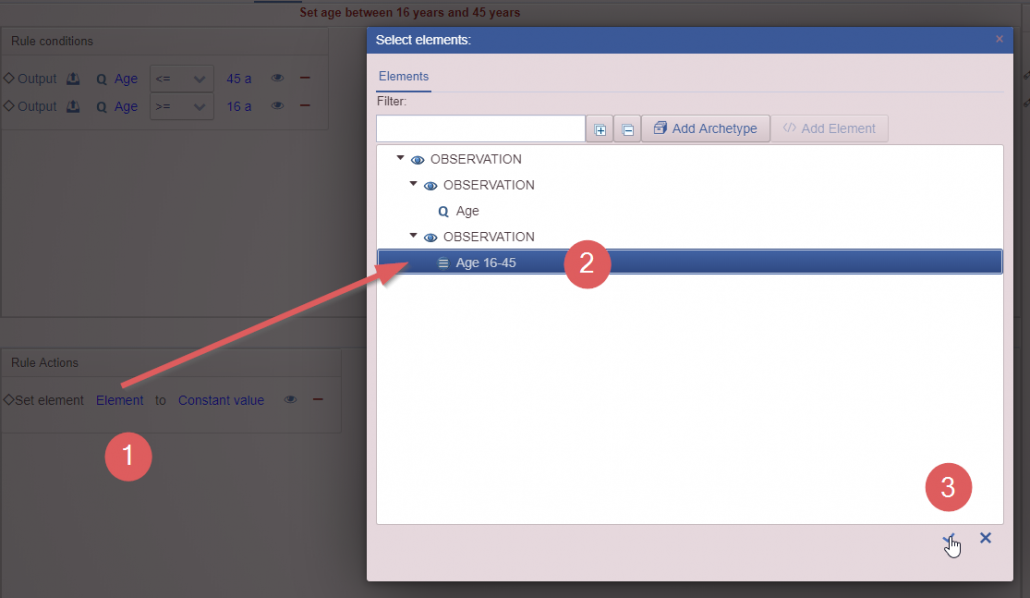
- Click on Element.
- Select Age 16-45.
- Click on the checkmark.

- Click on Constant Value.
- Select Yes from the drop-down (as this rule will fire if the age is calculated as between 16-45).
- Click on the checkmark.
The complete set of conditions and actions are shown below.
Once the rule is complete, one can trial run it:
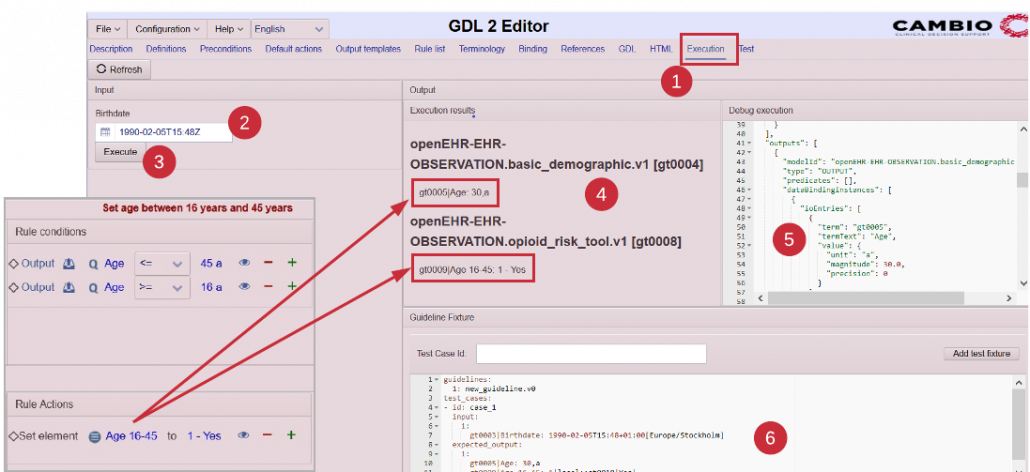
- Click on the Execution tab.
- Select the birthdate.
- Click on Execute.
- The results are produced in Execution results; the model checks that the age (30yrs) is between 16 and 45 and sets Age 16-45 to the ordinal value of Yes.
- The Debug execution shows the actual execution results from the GDL2 engine including the order of the rules fired.
- A test case has been generated in the Guideline fixture.
Next, how to use the “Or” and “Not” operator conditions will be covered. The rule shown below for the “No” ordinal value can be translated into “Age is less than 16yrs or above 45 yrs”, which can be modelled with the Not operator (Not between 16 and 45) or with the range as mentioned: <16yrs or >45yrs. The Or operator is used in this example:
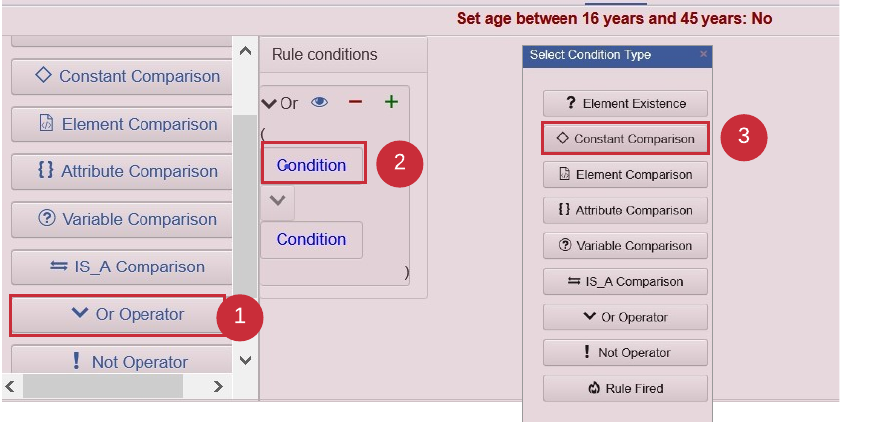

- Drag and drop the Or operator into the Rule conditions area.
- Click on one of the conditions in the Or box.
- Select the Constant comparison from the Select condition type list, opened up in a new window.
- Insert the age conditions into each Or slot.
- Set the age 16-45 action to No.
Creating a test fixture
In addition to executing the guideline in the Execution tab, we can further test the guideline using the Test tab. When one first enters the Test tab, the Test fixture is shown as an empty space. The steps to add test cases in the test fixture is as described below:
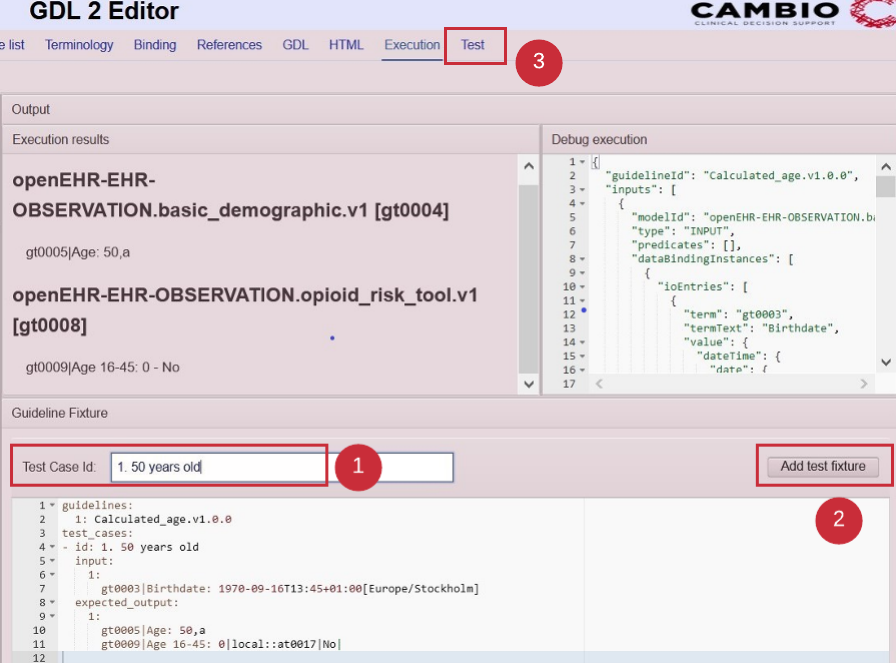
- The test case id of the Guideline fixture generated in the Execution tab is first given a descriptive name as shown in the image above.
- Click on the Add test fixture button. This adds the test case to the test fixture in the Test Tab. Add more test cases following the same pattern.
- Clicking on the Test button takes you to the Test Tab.
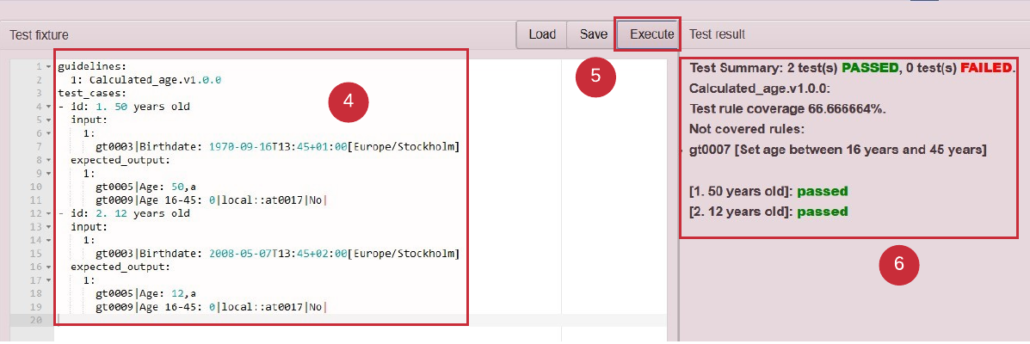
- All the added test cases are found under the Test fixture.
- Clicking on the Execute button executes all test cases written in the Test fixture.
- The Test result section shows a Test summary which includes the number of tests passed and the number of tests failed. It also shows the percentage of Test rule coverage, the test rules that have not been covered, and the test cases as passed or failed.
The test fixture is saved to a separate file by clicking on the Save button next to the Execute button.
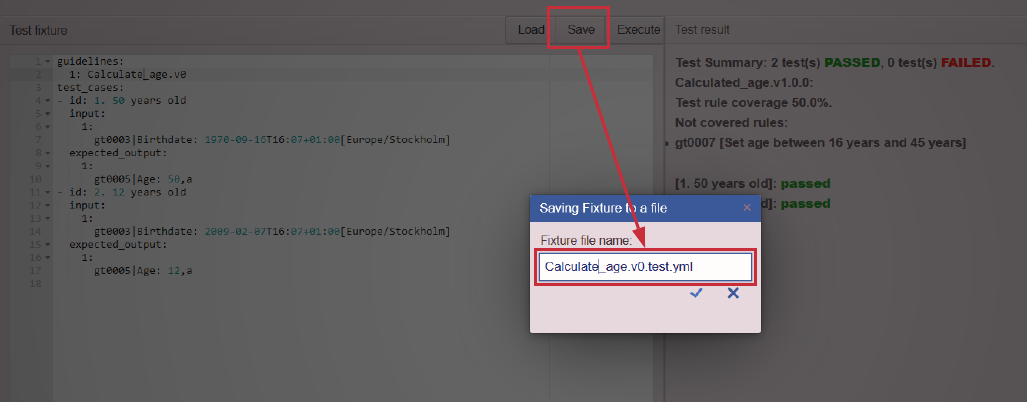
Name the file in the following convention:
guideline_name.guideline_version.test.yml
In this case: Calculate_age.v0.test.yml.
The test fixture can now be uploaded in the Test tab at a later time and be used to verify that any changes made to the guideline have not introduced errors to the execution.
More Features
Most basic guideline models do not require any further steps, but more complex models set constraints in the Preconditions tab. This function provides a way to limit rule firing until a certain condition has been met.
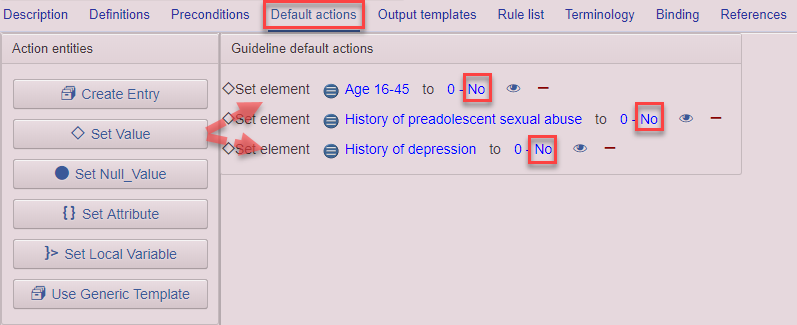
The Default actions tab contains rules that set baselines. For instance, the order of firing of rules is important in the GE as it runs from top to bottom, and if a user inputs a field but skips a previous one, the model may not fire at all. Thus, setting default values helps to ensure the model passes through all the rules to provide responsivity to the model and a baseline or neutral result is issued once the Execute button is pressed. These baseline values can be an ordinal of 0 as either NA (Not available) or the tag attached to a zero value – usually “No”. The Opioid Risk Tool used earlier has more ordinals than the age range used above. The image below displays how some of these ordinals would be set to “No” as a baseline default value in the Default actions tab:
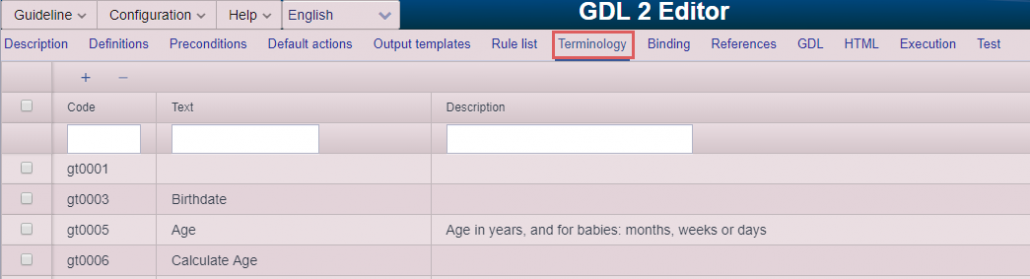
The Terminology tab works in a similar fashion to the tab of the same name in the Archetype Designer and contains codes similar to the at-codes explained in the archetype guide. Here they are called “gt-codes” and resemble the image below:
The Binding tab and associated Add Binding button allow for the binding or mapping of codes from other code systems such as ICD10 (International Classification of Diseases 10th Edition). Again, this is discussed in more detail in later examples that utilize this function.
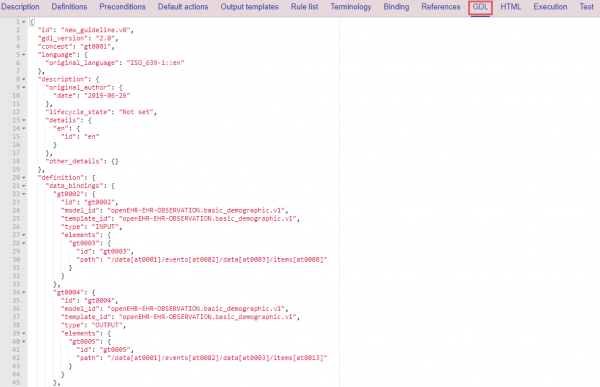
The GDL and HTML tabs display the model in either GDL or HTML format, which is close to displaying the guideline in a presentable web-based form. These screens are shown below:
GDL:
HTML:
This is the end of the basic GDL2 Editor guide.