Guideline Tutorial II
Introduction
This tutorial guide is a supplement to the Archetypes guide, utilising existing models to provide a step-by-step demonstration on how to design basic guidelines for different types of clinical decision support (CDS) applications using the GDL Editor.
It is vital the model of a clinical concept is founded on solid scientific basis, and therefore it is essential that proper research has been done ahead of construction. When published, any user should be able to quickly review the material the model is based on; always make sure to list the references.
Resources containing more in-depth information are listed at the end of the document for quick access in case they are needed. There is also a link to our CDS Apps Overview page on GitHub containing over 100 demo applications (using 250+ archetypes) available in this section.
The guide has been written by the Clinical Modelling Group at Cambio Healthcare Systems.
All the best,
Clinical Modelling Group
Contributors
Eneimi Allwell-Brown
Jimmy Axelsson
Syeeda S. Farruque
Dennis Forslund
Creating the Guideline
In order to generate data for storage and documentation, a guideline is required. Guidelines are used to express clinical rules and algorithms. Their format is based on a publicly available specification called the Guideline Definition Language (GDL). Guidelines use one or more archetypes to mimic the rules used in clinical practice. Even if two guidelines use the same archetypes they can be used to model different concepts in accordance with their respective rules.
This guide provides step-by-step instructions on building a common protocol-based guideline model using the Guideline Definition Language (GDL) Editor. This example builds on the steps from the earlier introductory guide that provides instructions on installing and setting up the GDL Editor, and is an extension on the previous guide on creating an archetype for the Apgar score model.
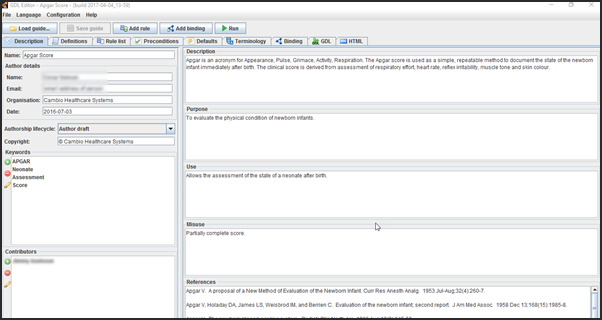
The Apgar score is a long established clinical tool that helps clinicians assess the health of new-born infants. The tool’s name is a mnemonic taken from the first letters of the words that represent the five aspects measured when assessing the patient; Appearance, Pulse, Grimace, Activity and Respiration. The Apgar score generates an accumulated total score as well as an overall assessment based on the result of the clinical examination. An image of the finished guideline is displayed below.
Metadata
First, add metadata under the Description tab which is opened upon launching the program: 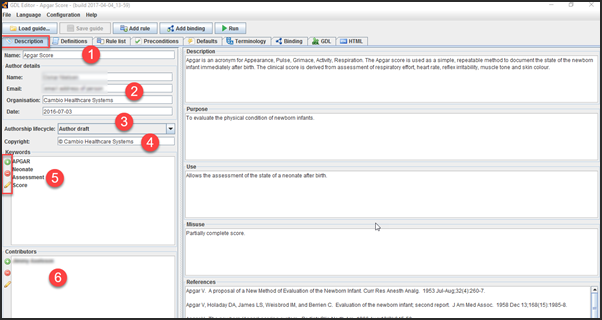
- Name the guideline.
- Enter the author details including organisation and date of creation.
- Select Author draft from the Authorship lifecycle drop-down menu.
- Add the copyright.
- Use the + to add and – to remove keywords. The pencil icon can be used to edit existing keywords.
- Enter the name of any contributor.
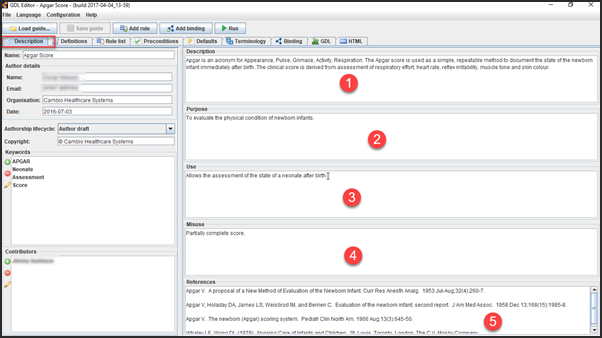
Next, enter text into the 1. Description, 2. Purpose, 3. Use, 4. Misuse and 5. References sections:
Once all the metadata is filled in, ensure the model is saved.
Definitions
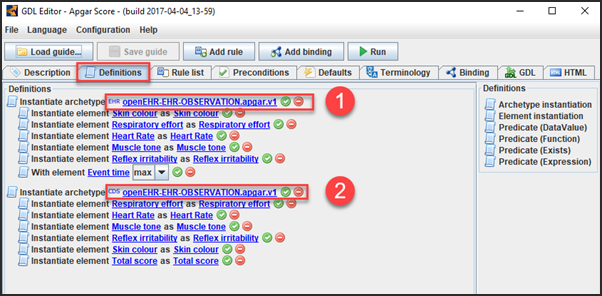
After all the metadata has been added, the next tab to go to is the Definitions tab.
Complete definitions of the finished Apgar score guideline are displayed in the image below. There is one input (EHR) archetype and one output (CDS) archetype. Each archetype contains attribute elements of the five clinical parameters, with the EHR archetype assigning an additional event time element. The CDS archetype also holds a total score element for generating an accumulated sum.
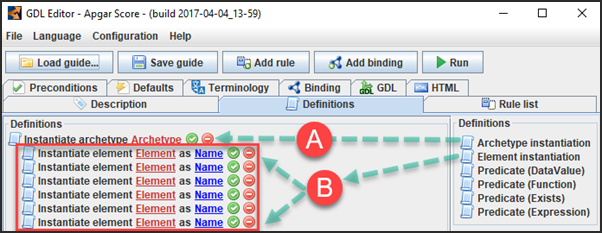
To instantiate the EHR archetype and its components, simply follow the instructions.
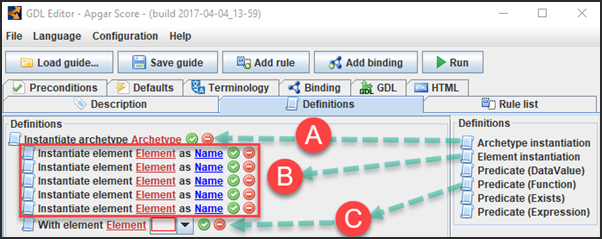
- Drag and drop the Archetype instantiation object into the main modelling area.
- Drag and drop five Element instantiation objects on top of the already instantiated blank archetype.
- Drag and drop the Predicate (Function) element on top of the already instantiated blank archetype. This element will ensure the values used in the tool are always the most recent (event time max).
Assign the blank elements as shown below:
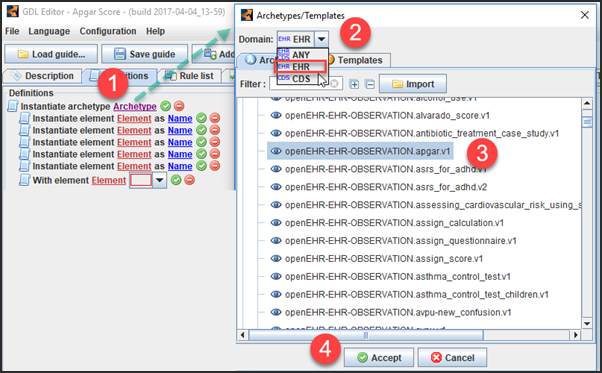
- Click on Archetype within the archetype instantiation slot.
- Select EHR from the domain drop-down menu.
- Select the Apgar observation archetype from the list.
- Click on Accept.
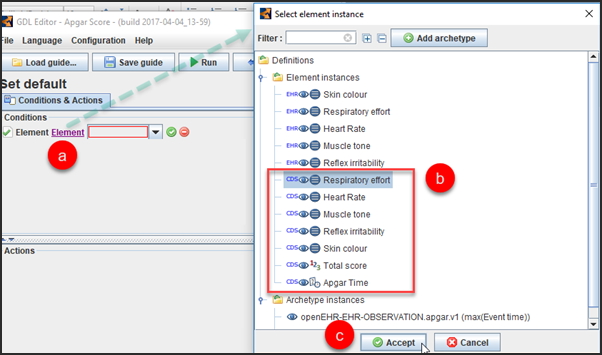
Then, assign the five Apgar score parameters into their respective element instantiation field by following the instructions.
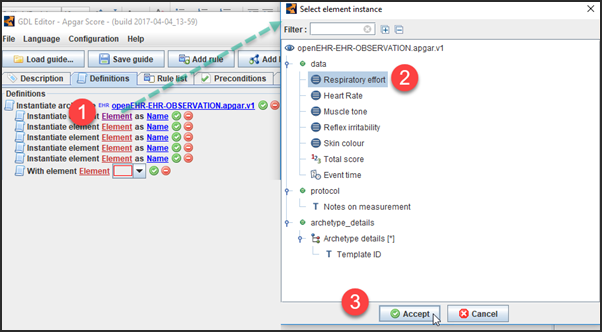
- Click into the first Element field of the listed element instantiations.
- Select the first of the five Apgar options (Respiratory effort).
- Click on Accept.
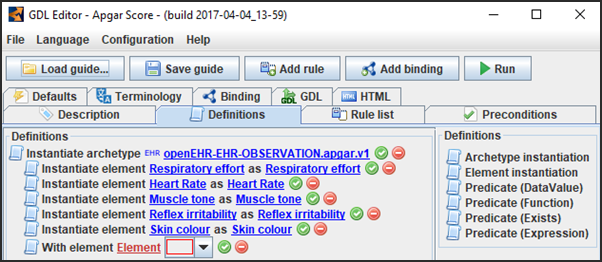
Repeat this process for the rest of the parameters. As each of the parameters are entered into their respective element instantiation sections, the Name field is automatically filled in. This second field is editable, permitting a more unique and descriptive term to be entered if required. The resulting view is displayed below.
The last part to enter is the Predicate (Function) element:
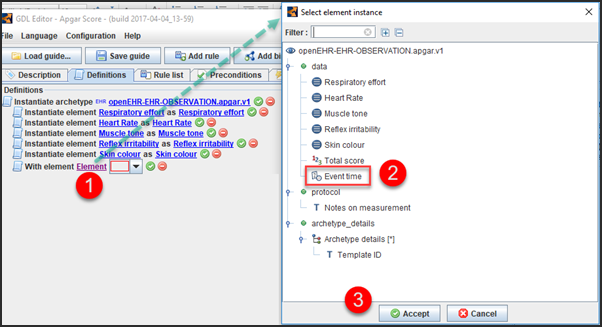
- Click on Element within the Predicate (Function) slot.
- Select the Event time attribute.
- Click on Accept.
- Choose max from the event time drop-down menu.
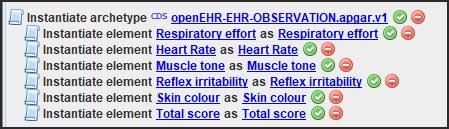
Instantiating the CDS (output) archetype follows the same principles.
- Drag and drop the Archetype instantiation object to the main modelling area.
- Drag and drop six Element instantiation objects on top of the already instantiated blank archetype.
Then, assign the five Apgar score parameters into their respective element instantiation field following the same method as before, only this time make sure the archetype domain is set to CDS instead of EHR. For the sixth and last slot, choose the count element Total score from the list. The resulting view is displayed below.
Rules
Once all the definitions have been created, they can be used to construct the rules for the Apgar score application. New rules are created by clicking on Add rule, and can be modelled in a number of ways. Below, a common method for protocol-based guidelines like the Apgar score is displayed.

The first rule, Set default (displayed in detail in the image below), allows the model to set a baseline value; a neutral or zero value to all CDS output in the event the user does not enter them.
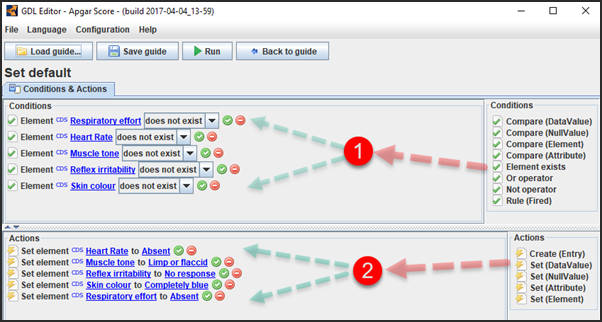
The top Conditions pane contains each of the five Apgar score parameters instantiated from the Element exists condition from the right-hand list (1). On the bottom part of the screen, the resulting output value is set. A common way to model the default rule is to make it so that if there is no input (and consequently no generated output), the score is simply set to zero. In this case then, if there is no output, all parameters are each set to the alternative generating zero points (2).
To construct this rule, click on Add rule. Name the rule and click on Accept to generate a blank form. In the top Conditions pane, all five Apgar score parameters should be instantiated from the Element exists condition.
- Click on the Element slot.
- Select the Respiratory effort element from the CDS attribute list.
- Click on Accept
Repeat for all five parameters, and then choose the alternative does not exist from each drop-down menu.
Next, drag and drop Set (DataValue) from the Actions panel into its modelling area.
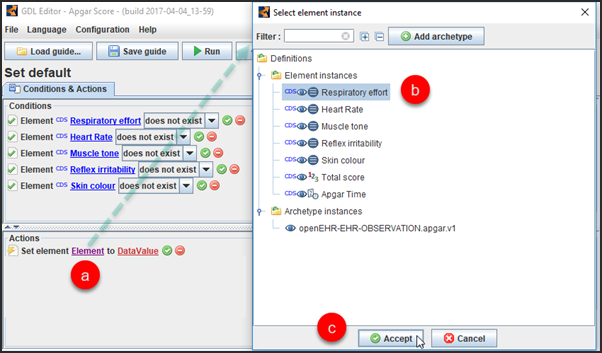
- Click into the Element field.
- Select the Respiratory effort element from the listed items – these are automatically CDS as only output type variables are allowed in the Actions section.
- Click on Accept.
Repeat for all parameters. Then click on DataValue and select the alternative generating zero points in accordance with the protocol provided below.
| Apgar score | 0p | 1p | 2p | |
| A | Activity, muscle tone | Limp or flaccid | Reduced tone | Normal tone |
| P | Pulse, heart rate | Absent | <100 beats per minute | ≥100 beats per minute |
| G | Grimace, reflex irritability | No response | Reduced response | Normal response |
| A | Appearance, skin colour | Completely blue | Body pink; extremities blue | Completely pink |
| R | Respiration, respiratory effort | Absent | Weak or irregular | Normal |
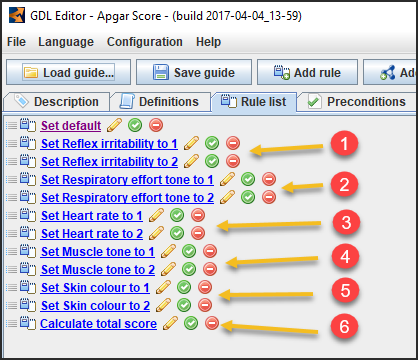
Rule pairs one to five are constructed for the five Apgar score parameters which, depending on the input, should each be able to generate a score of either one or two points in accordance with the protocol. Thus, there is one rule for each possible output value. The rules are triggered sequentially along the list i.e. if the input does not fulfill the first rule, the next one is tested and so forth. The very last rule (6) is where the sum total is calculated and stored.
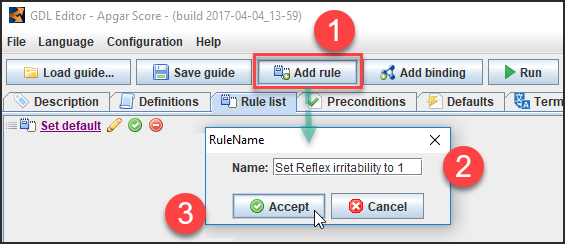
- Click on Add rule.
- Name the rule Set Reflex irritability to 1.
- Click on Accept.
Drag and drop the Compare (DataValue) condition element from the right-hand side to the Conditions modelling area.
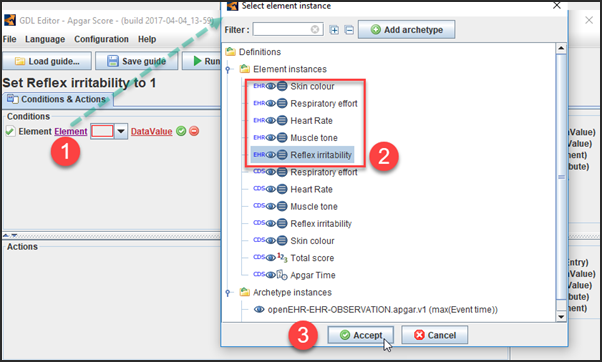
- Click on the Element field.
- Select Reflex irritability from the EHR attribute list.
- Click on Accept.
Select the == symbol from the drop-down menu.

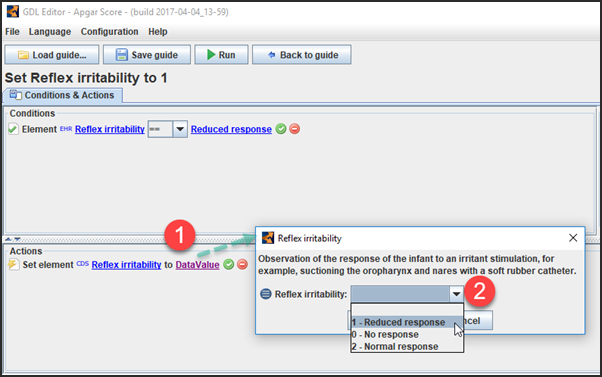
- Click on DataValue.
- Select the ordinal value of 1 – Reduced response from the drop-down menu.
Once the selection is made, click on Accept to assign the value.
After assigning the condition, the action part of the rule is to be set; the resulting generated output should the condition be met. Drag and drop the Set (DataValue) action element to the Actions modelling area.
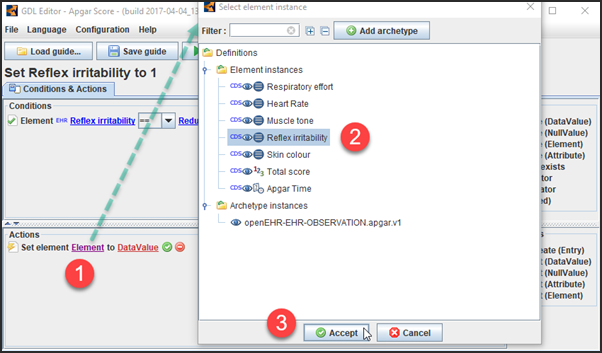
- Click on Element.
- Select the Reflex irritability attribute – these are automatically CDS as only output type variables are allowed in the Actions section.
- Click on Accept.
- Click on DataValue.
- Select the value 1 – Reduced response from the drop-down menu.
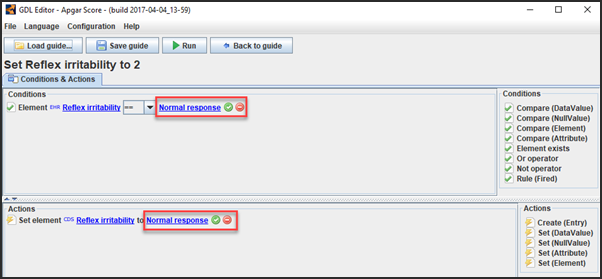
Once the selection has been made, click on Accept to assign it. The rule is now completed, and will generate an output of one point for the alternative “Reduced response” should it be entered as input for the parameter “Reflex irritability”. Repeat the process to create the next rule, Set Reflex irritability to 2, with the modification of selecting the alternative rendering two points in accordance with the protocol; “Normal response”. The finished rule is displayed below.
The rules for the other four parameters are modelled using the same principles.
| Apgar score | 0p | 1p | 2p | |
| A | Activity, muscle tone | Limp or flaccid | Reduced tone | Normal tone |
| P | Pulse, heart rate | Absent | <100 beats per minute | ≥100 beats per minute |
| G | Grimace, reflex irritability | No response | Reduced response | Normal response |
| A | Appearance, skin colour | Completely blue | Body pink; extremities blue | Completely pink |
| R | Respiration, respiratory effort | Absent | Weak or irregular | Normal |
To construct the final rule, click on Add rule and name it Calculate total score.
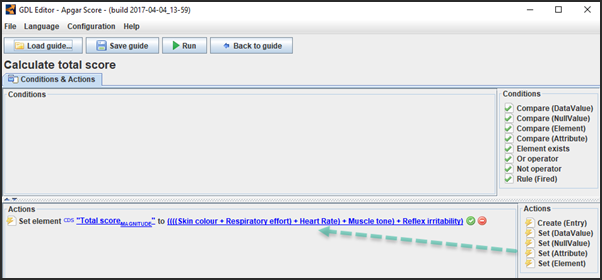
As output values have been generated through the already created rules, there are no conditions required for the calculation of total score; therefore, it only has a set action. Drag and drop Set (Attribute) into the actions modelling area.
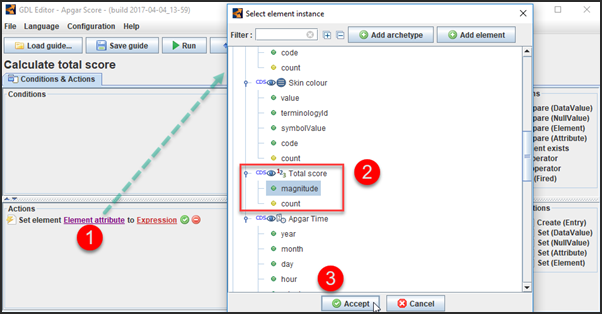
- Click on Element attribute.
- Select the magnitude element from Total score.
- Click on Accept.
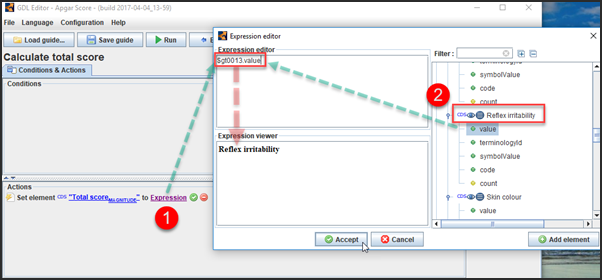
- Click on Expression.
- Select the Value attribute of the Reflex irritability CDS (output) element. This then translates into a gt-code for the item. The human-readable representation can be seen in the Expression viewer.
As the idea is for all output values to be added up into a total score, enter a + and then add the other four parameters in the same manner. The resulting expression is displayed below; note the use of parenthesis required to complete the expression.
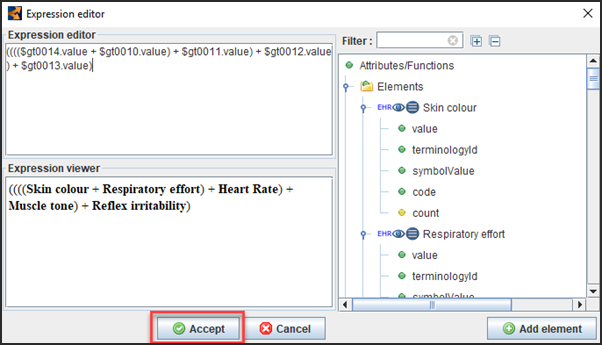
Click on Accept to finish.
Overview and Trial Run
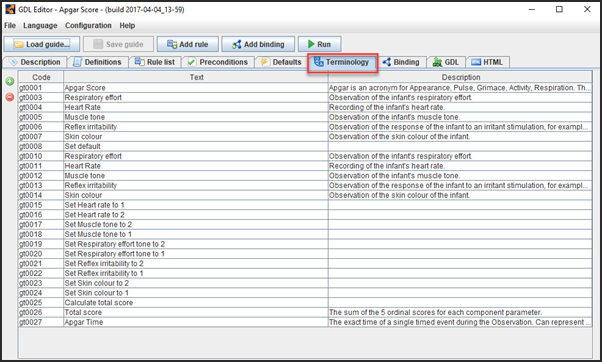
Once all the data has been added, the Terminology tab displays the codes:
All that is left is to test the model:

- Click on the Run button.
- Do not make any selections in the input section.
- Click on Execute.
- The Result panel at the bottom displays the default output (as in the Set default rule) and hence all elements as well as the total score are set to zero.

- Now enter some input values.
- Click on the Event time calendar icon to open the date box and select the date.
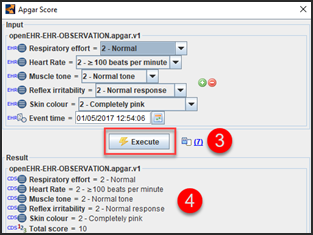
- Click on Execute.
- The generated result along with the calculated total score is displayed under Result.